Information contained in nature ... allows us a partial reconstruction of the past. ... The development of the meanders in a river, increasing complexity of the Earth's crust ... are information-storing devices in the same manner that genetic systems are. ... Storing information means increasing the complexity of the mechanism.
~ Ramon Margalef as quoted in Meadows, 2008Most schools aren't located in places that are convenient to rock outcrops - except when it snows. As Margalef notes there are a variety of ways that nature stores information that allow us to reconstruct the past. This applies to rocks and snow as well as the examples listed above.
This post describes how to use a snow pit as a rock outcrop and offers a venue for sharing geo-located, time-stamped pictures and descriptions of your snow outcrop. The sharing can allow for correlation across outcrops, including those formed across much of the country during the Ground Hog's Day Blizzard of 2011.
The activity described here seizes the teachable moment -- substantial snow cover over a very large area. It may have imperfections as it was rushed to completion. Please use the last question in the form or the comments section of the blog to offer suggestions for improvement.
The activity described here seizes the teachable moment -- substantial snow cover over a very large area. It may have imperfections as it was rushed to completion. Please use the last question in the form or the comments section of the blog to offer suggestions for improvement.
Snow is rock and sediment.
As a naturally occurring aggregate of mineral crystals, snow piled up on the ground meets the requirements of being a rock. It's a rock made of just one mineral and the mineral it's made up of is, of course, ice. Ice in the form of snow is a naturally occurring crystalline solid, formed through geologic processes with a characteristic chemical composition, a highly ordered atomic structure and specific physical properties. In other words, ice in the form of snow is a mineral.
Of course, when it first falls, it's just sediment, but it will typically consolidate to some degree as it melts, or before it melts. Frequently, through either compaction or melting and refreezing, the snow or layers within the snow, will harden into a single, massive unit over a large area. Rocks harden through a process of heating or baking, or through compaction and cementation, or a combination of these processes. Does that description apply to snow hardening into solid layers?
Of course, when it first falls, it's just sediment, but it will typically consolidate to some degree as it melts, or before it melts. Frequently, through either compaction or melting and refreezing, the snow or layers within the snow, will harden into a single, massive unit over a large area. Rocks harden through a process of heating or baking, or through compaction and cementation, or a combination of these processes. Does that description apply to snow hardening into solid layers?
Just as limestone is typically made up of a single mineral (calcite), so is snow. Snow also forms in one of the ways that limestone forms -- it precipitates out of a supersaturated solution.
Like with the things typically thought of as sedimentary rocks, snow usually is deposited in horizontal layers, with the oldest layer at the bottom. The characteristics of those layers in either snow or rock, tell you something about the environment of formation and those characteristics can also tell you something about how the environment has changed since the materials formed.
If the snow is disturbed, by a snowplow or from sliding off of a metal roof, for example, you will likely find the characteristics of debris flows and avalanches. Perhaps you can find these in melting snow sliding off of cars. Where else might you look for such features? What other kinds of things might you look for? Please share your ideas in the comments section of the blog!
If the snow is disturbed, by a snowplow or from sliding off of a metal roof, for example, you will likely find the characteristics of debris flows and avalanches. Perhaps you can find these in melting snow sliding off of cars. Where else might you look for such features? What other kinds of things might you look for? Please share your ideas in the comments section of the blog!
As there can be gaps in the rock record, so can there be gaps in the snow record. Uncomforities in the snow record form when the snow melts, or possibly when the wind clears some away, and, at least arguably, each time it stops precipitating for a while.
Snow is an opportunity for geologic fieldwork.
This provides a great opportunity. For a lot of reasons, it's difficult to get a class of middle or high school students outside to do geologic fieldwork. The distance to the nearest outcrop coupled with the duration of the class period makes it a big challenge. But if your school has more than a few centimeters of snow outside its doors, then, at least for the time being, doing at least a bit of fieldwork has gotten a whole lot easier!
Of course, you don't need to be a student or a teacher to engage in this study.
Of course, you don't need to be a student or a teacher to engage in this study.
If you've got time, there are possibilities for doing fascinating in depth study of snow, but that's not what suggested here (see the links at the end of the post for some resources for more detailed snow study). What is intended is a manageable way to engage people in the study of an outcrop. A primary goal of the activity is to provide students with the opportunity to study an outcrop and to correlate between outcrops.
What to do:
You may wish to dig a single pit or multiple pits. If this is done as a laboratory activity for a full class, it makes sense to dig multiple pits, and, even if you are working alone or in just a small group, digging two pits will help you see the correlation of layers across the schoolyard (or your backyard). Of course, if there is a lot of snow, a single pit may require a fair amount of effort to dig out.
Here's a video showing the most basic study of a snow pit.


You might also...
What kinds of things can be learned by studying snow?
In this activity, we have used snow as a general model for studying rocks and rock outcrops. There are a great many other reasons to study snow. Here are a few links to further resources that relate to why you would study snow.
Resources for more in depth snow study:
Learn about Google's Spreadsheet Mapper:
What to do:
You may wish to dig a single pit or multiple pits. If this is done as a laboratory activity for a full class, it makes sense to dig multiple pits, and, even if you are working alone or in just a small group, digging two pits will help you see the correlation of layers across the schoolyard (or your backyard). Of course, if there is a lot of snow, a single pit may require a fair amount of effort to dig out.
Here's a video showing the most basic study of a snow pit.
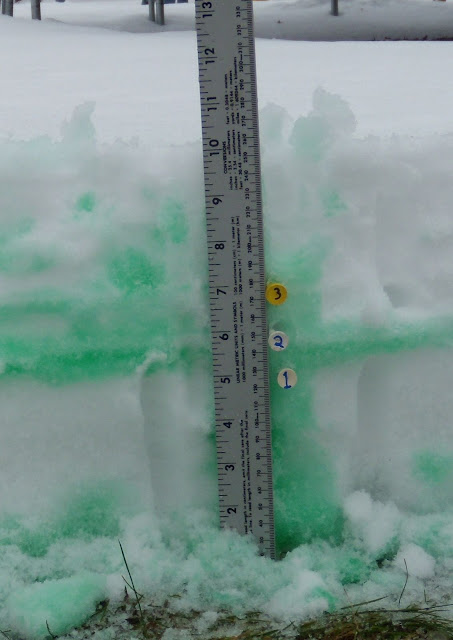
Note that upon closer examination, the snow depth is closer to 25 cm (10 inches) than to 28 cm (11 inches)
- Equipment used may need to acclimate to outdoor temperatures before use.
- You will take a picture or two. Check to see that your camera's date and time are set correctly as this will help in data sharing.
- Dig a snow pit like the one shown in the video. I used a garden spade shovel, with a flat blade. Any shovel should work - just scrape the face of the snow to a flat, vertical surface to finish the pit. If you are working in an area where the snow is over your head, you should receive safety training before digging.
- Brush the face of snow pit with a whisk broom or, if unavailable, the snow brush from a car. The brush will make the harder layers stand out more clearly.
- Run your ungloved finger down the face of the snow outcrop to detect the individual layers in the snow.
- To make the individual layers more apparent, insert markers at the top and bottom of each layer. Golf tees work nicely, but many substitutes are possible. I've done used golf tees in the picture below, and I numbered them to make the description easier. The tees are stuck in the snow at the tops of the most obvious layers, except for #3, as the layer is very thin (about 3mm). There is also no tee at the top of the top layer as the fresh snow is too fluffy to hold the marker.
- Record the thickness of each layer. Begin measurement from the ground up, as the ground's location will not change and the levels of the snow horizons will.
- Complete the form below to share your data.

Figure 1. A snow profile with golf tees marking different layers. The ruler is vertical. There is some space between it and the bottom of the snow profile as the bottom layer was partially carved out.

Figure 2. This photo zooms in on and labels to the photo in Figure 1.

Figure 3. Spraying with colored water can make the layers more apparent. The photograph in Figure 3 was taken three days after those in Figures 1 and 2, and less than two meters away. See a 2 minute video here.Below the form are some other things you might do or investigate.
You might also...
- Measure the hardness of the snow. Calibrate your finger hardness force. Push on your cheek toward your teeth with your finger (no pain) or push on the tip of your nose (no pain). The video here shows both how you use your fingers to measure snow hardness and a context where this really matters (avalanche forecasting).
- Fist -- 10 g/cm²
- Four fingers -- 25 g/cm²
- One finger -- 100 g/cm²
- Pencil -- 500 g/cm²
- Knife -- 1000 g/cm²
- Study freshly fallen snowflakes with a magnifying glass or microscope. If possible, catch snow when it falls on black paper and look at with a magnifying glass or microscope. Research what the different flake shapes indicate about the environment of formation, or figure this out for yourself by collecting snow flakes under different weather conditions.
- Study snow from the snow pack with a magnifying glass or microscope. The characteristics of the snow changes fairly rapidly (it metamorphoses!) as snow accumulates on the ground. How does snow from the different layers of the profile appear different under magnification? What do these differences suggest? This kind of work parallels what would be done for geologists to correlate rock layers between outcrops.
- Record temperatures at different depths of snow. Is the snow of uniform temperature?
- Investigate questions of your own.
What kinds of things can be learned by studying snow?
- Dust and Snow: This news story describes scientists investigation of how dust can change the rates of melting snow, where the dust comes from and why dust matters.
- Avalanche Prediction: This is one of several youtube videos that show how ski patrols and back country skiers study snow pits to determine the likelihood of avalanche.
- Interdisciplinary Research: This youtube video from the National Science Foundation's Integrative Graduate Education and Research Traineeship (IGERT) Program hints at the range of kinds of scientists who might study snow.
Resources for more in depth snow study:
- SSSNow Project: Helping make science cool for students by Kenneth Huff and Catherine Lange. This article from NSTA's January 2010 Science Scope describes activities for investigating snow in multiple ways.
- NASA's History of Winter page: This has some nice videos and student handouts related to studying snow pits.
- The Northern Climate Change Schools Program: This site has a number of good resources focused on studying climate change in northern latitudes, but some of them, like the snow pit study are applicable anywhere that has more than a few centimeters of snow on the ground.
- Snow Pit Observation; Snow Metamorphism; Snow Stratigraphy, a lab by Steve Custer at Montana State University. This lab includes a good overview of many of the things you might study about snow and concise directions on how to do that.
- Virtualfieldwork.org's Lake Effect Snow page: This page is a collection of resources that were assembled for a single lesson. It points to some resources beyond those listed here.
- CoCoRaHS: Community Collaborative Rain, Hail & Snow Network: CoCoRaHS is a grassroots volunteer network of backyard weather observers of all ages and backgrounds working together to measure and map precipitation (rain, hail and snow) in their local communities.
Learn about Google's Spreadsheet Mapper:
We expect to have the data available in both Google Map and Google Earth formats by using the data you provide and Google's Spreadsheet Mapper. Learn about it here.
Content developed by the Paleontological Research Institution. Thanks to Bill Kean of University of Wisconsin, Milwaukee for his suggestions, to the students and teachers at Commonwealth Connections Academy, and, of course, to all the authors of the materials linked above.
No comments:
Post a Comment